Part 2: Create a Terraform project
Terraform Project’s Structure
The module structure in Terraform is quite flexible. However, we do believe that a good structure and naming rules is essential to guarantee its correct maintenance in Day-2 operations.
Code in the Terraform language is stored in plain text files with the .tf file extension. You can keep all your code in a single main.tf file with hundreds of lines of code, or split it into multiple well-named files and folders that make sense for your use case (just in case, this is the right choice). Below is an example of a simple project structure:
main.tf: Declare all resource and datasource definitionsoutputs.tf: Declare all outputs in this file. Output values are similar to return values in programming languagesvariables.tf: Declare all input variables in this file. Input variables let you customize aspects of Terraform modules without altering the module's own source codeterraform.tfvars: Assign/override values of the variables defined in thevariables.tffile
Steps
1. Import the provider
Each Terraform module must declare which providers it requires, so that Terraform can install and use them. Provider requirements are declared in a required_providers block. You can also specify a version constraint for compability restrictions.
Some providers require additional settings (i.e.: credentials, a default project, a region, etc) before Terraform can use them.
Create a main.tf file to configure the provider. Insert the code below and keep the auth_token as is, we will update it later in this workshop.
terraform {
  required_providers {
    equinix = {
      source = "equinix/equinix"
    }
  }
}

# Credentials for Equinix Metal resources
provider "equinix" {
  auth_token = "someEquinixMetalToken"

  ## client_id and client_secret can be omitted when the only
  ## Equinix service consumed are Equinix Metal resources
  # client_id     = "someEquinixAPIClientID"
  # client_secret = "someEquinixAPIClientSecret"
}
2. Specify resources you'll use
Define a new metal project and set your organization ID.
resource "equinix_metal_project" "project" {
  name = "Terraform Workshop"
  organization_id = "someEquinixMetalOrgId"
}
Add a new Equinix Metal device (baremetal server) with an implicit dependency in project_id.
resource "equinix_metal_device" "device" {
  hostname         = "tf-device"
  plan             = "c3.small.x86"
  metro            = "sv"
  operating_system = "ubuntu_20_04"
  billing_cycle    = "hourly"
  project_id       = equinix_metal_project.project.id
}
Add a new Equinix Metal project SSH key. Insert the code below and keep it as-is, we will update it later in this workshop.
resource "equinix_metal_project_ssh_key" "public_key" {
  name       = "terraform-rsa"
  public_key = "someRsaSshKeyContent"
  project_id = equinix_metal_project.project.id
}
Use the Terraform TLS provider to create an OpenSSH formatted private key.
Pro Tip: unless you need a specific provider version, none of the official hashicorp providers need to be added to the
terraform.required_providersblock.
Use terraform local provider to store the private key.
resource "local_file" "private_key" {
  content         = chomp(tls_private_key.ssh_key_pair.private_key_pem)
  filename        = pathexpand(format("~/.ssh/%s", "equinix-metal-terraform-rsa"))
  file_permission = "0600"
}
Update equinix_metal_project_ssh_key.public_key to reference the public key.
resource "equinix_metal_project_ssh_key" "public_key" {
  ...
  public_key = chomp(tls_private_key.ssh_key_pair.public_key_openssh)
}
Pro Tip: you can use
depends_onmeta-argument to declare explicit dependencies between resources.
If you create a new device in a project, all the keys of the project's collaborators will be injected to the device. Add depends_on in the device resource to make sure the key is created before the device.
resource "equinix_metal_device" "device" {
  ...
  depends_on = [ equinix_metal_project_ssh_key.public_key ]
}
3. Create an Outputs file
Create an outputs.tf file to expose some computed attributes that you will need later.
output "project_id" {
  value = equinix_metal_project.project.id
}

output "device_id" {
  value = equinix_metal_device.device.id
}

output "device_public_ip" {
  value = equinix_metal_device.device.access_public_ipv4
}
4. Create a Variables file
Create a variables.tf file to more easily define inputs.
variable "plan" {
  type        = string
  description = "device type/size"
  default     = "c3.small.x86"
}

variable "metro" {
  type        = string
  description = "Equinix metro code"
  default     = "SV"
}

variable "os" {
  type        = string
  description = "Operating system"
  default     = "ubuntu_20_04"
}
Update main.tf to start using these new variables.
resource "equinix_metal_device" "device" {
  hostname         = "tf-device"
  plan             = var.plan
  metro            = var.metro
  operating_system = var.os
  billing_cycle    = "hourly"
  project_id       = equinix_metal_project.project.id
  depends_on       = ["equinix_metal_project_ssh_key.public_key"]
}
5. Create a Tfvars files
Default variable values can be overridden on the command line. In fact, a default value is not even required, Terraform will prompt for an input for the variables with no default value.
To set lots of variables, it is more convenient to specify their values in a variable definitions file .tfvars.
Create a terraform.tfvars file and add key/value inputs for the variables.
Pro Tip: you can have multiple
.tfvarsto reuse your code in different projects/locations/environments, such asdev.tfvars,staging.tfvars,web_frontend.tfvars,web_backend.tfvars, etc. You will be able to specify which one you want to use when creating the infrastructure
6. Leverage environment variables
It is not a good practice to include your credentials directly in your template. Although there are more secure options, a good first practice is to use environment variables instead. Before using a new provider, checkout its documentation for more details on the available authentication methods.
To configure Equinix Metal credentials, you will need to add the METAL_AUTH_TOKEN variable.
Pro Tip: You can use metal-cli to add the required credentials without printing them on your screen
In Bash:
Use
--helpfor other shells examples:
Now, you can delete the auth_token = "someEquinixMetalAPIToken" line we kept in main.tf file
Just one last Tip, any variable you set on your .tf templates (plan, metro and os in this workshop)
can be set as a environment variable in the format TF_VAR_name and this will be checked last for a value. For example:
Check out the metal CLI for some useful variables you can take advantage of in your projects:
7. Verify the project structure
At this point, your project should look like this:
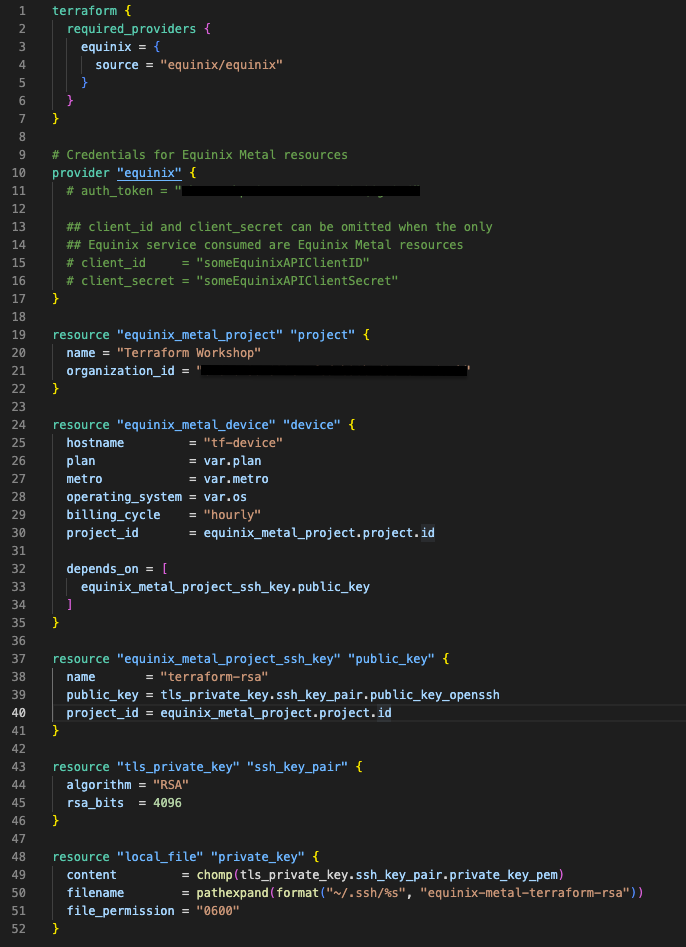
And the main.tf file should look like this:
Discussion
Before proceeding to the next part let's take a few minutes to discuss what we did. Here are some questions to start the discussion.
- Can other providers be used in the same template/project?
- Are all the Equinix platform resources available on Terraform?